The New Collection is Almost Here!

Gorjuss in her Spring and Summer Fun!

Dyan Reaveley Oh-So Vibrant spray is Here!

Create backgrounds on cards, scrapbook and journal pages, and in mixed media art projects. !

Cutters Dies!

From our favorite stamp company..WOJ, CC Designs and My Favorite Things!

Enjoy another great release from My Favorite Things!

Pure Innocence, Mouse in the House, Clearly Sentimental, A la Modes and Die-namics.

The one and only Henry the Mouse!

Fun, Upbeat and Animated designs perfect for traditional and classic styles!

Join the Fun!


Commenting Giveaway Alert: This week we will draw a name from all the comments left on this week's new posts and give away a $5 gift certificate! The more posts you comment on, the more chances you have to win.


4/29/11

Vintage Angel ~

Hey all!  Alyssa here one last time before you get to gain inspiration from the whole new fabulous design team!  How exciting!!  Have you bopped over to everyone's blogs and checked out their amazing talent?  If not, you should...I'm learning some amazing tricks from these wonderful ladies!
I have a card today that was inspired by a text sent from a stampy friend the other day.  She asked if you could color images stamped with other Memento inks besides Tuxedo Black, specifically Rich Cocoa.  Well, I was pretty sure that you could but I just had to try it out myself!  Plus, I just got my iCopic order the other day and had purchased E42 just to be able to do a sepia angel. 
Coloring an image in sepia tones is exactly like coloring in black and white.  I chose the lighter colors for her skin tones and halo (E41, E42 & E43) shading first with the darker colors and blending out with the lighter colors.  The 0 Colorless Blender was used to make it all come together without too harsh of lines.  Her dress and hair are done with the darker tones (E43, E44 & E49).  This was a little harder because there is such a gap between the 44 and 49, but I like the results all the same.  Her wings and ruffle of her dress have just a hint of E41.  As a last touch, I added some sparkle with a clear glitter pen on her wings and halo. 
After cutting her out with a large plain nestabilitie die, I used a 0.03 Copic Multiliner to trace the inner circle leaving just a slight gap to add a few black pearls.  These sepia tones really match well with kraft paper, which I love!  This paper is from a retired Stampin' Up! set from eons ago.  This little ditty is finished off with some natural twine, a black button and a couple larger pearls framing the sentiment. 
Thanks so much for stopping by!  Please let me know if you have any questions!!  Have a great weekend!!  :o) lyss

Copics {0 Colorless Blender, E41, E42, E43, E44, E49}     Edited to Add: I forgot to mention this...in case it isn't obvious, the angel is stamped in Memento Rich Cocoa ink and is from The Greeting Farm's Naughty or Nice set.

4/26/11

Tuesday Tips and Tricks: Part 1

 Hello everyone!

EDITED TO ADD: I am still having issues with Youtube not uploading my video, so I will postpone my video and save it for another day whenever I get it working.

I have had some technical difficulties getting my video ready to go for today's segments, so I am going to extend Tuesday Tips and Tricks into two parts.  Part 1 is below.


I want to talk to you today about Airbrush masking! This is one of my absolute favorite techniques!! And the truth is, it is really easy to do!! All you need is some Copics and an airbrush system.

If you are like me and have tons of Copic Ciao markers, never fear, you can still airbrush with the copic system with an easy fix. Click here to watch my video on how I "converted" my airbrush system to use it with my Copic Ciao markers.

The basic idea is, take a shape made out of paper or something thin (a die cut shape or a masking template that you buy pre-made, some are plastic) and that serves as your MASK. Then, attach it temporarily to your project, and airbrush around it.

When you remove the mask, then the shape area still shows up because the ink is only around where the shape had been! My video for Part 2 is going to show you some tips for easy masking and an advanced masking technique.


On the following two projects, I used a basic masking technique.


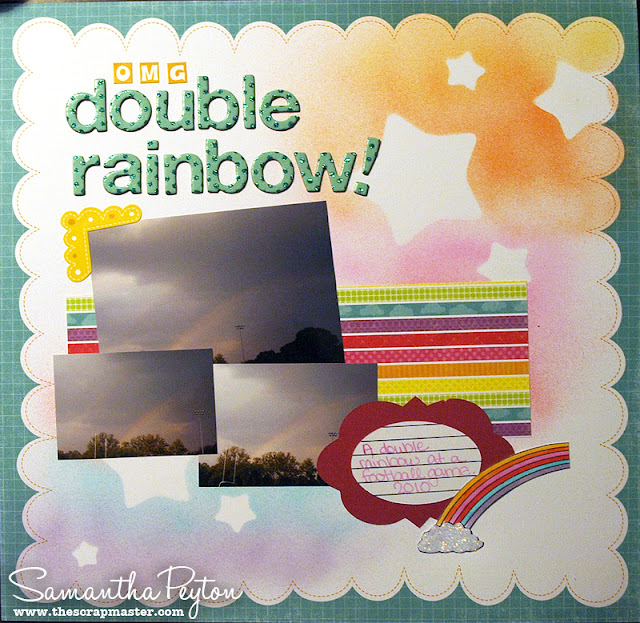
For the layout above, my "mask" was some star shapes. I just attached them and then airbrushed around the masks with various rainbow colors: Y38, YR68, RV55, R27, BG45, and V25. Complete layout details are here.


On the card above, the "mask" was a die cut sentiment. I attached it and airbrushed with B24. Complete card details are here.

You can get really creative and do all sorts of things with masking! It is just such a fun technique!!


4/25/11

iCopic Challenge #27 - Pastel Challenge

Hi everyone!! Happy Monday!

Since we are now in the spring spirit after Easter, this week's challenge is PASTELS! I challege YOU to do some pastel coloring. Make those projects look light and springtime-y. Think about colors in the 00's, 000's or even 0000's! The lighter the better.


With only a few basic crafting supplies, the eye-catching cards designs featured in Tea Bag Folding Through the Seasons can be created to share with friends and family.

Tea Bag Folding Through the Seasons

This is an example of some pastel coloring that I did.  This card features one of the BRAND NEW Magnolia stamps called Tilda with Hanging Rabbit. This stamp is now in stock at iCopic so go check it out. Complete details on my project can be found by clicking here. I even airbrushed a pastel background around my stamped image.

Entries are due SUNDAY May 1st at Noon EST. The winner will be showcased Sunday evening right here on the iCopic blog AND will receive a lovely prize!


Enter below with a direct link to your project:
iCopic Challenges Participants
1. darling Ho
2. Mary Lou
3. Rene
4. Susanne
5. Annie (ink'n'rubba)
6. Heaney
7. ♥Jodi S♥
8. darling Ho
9. Jan Hunnicutt
10. darling Ho
11. Lisa - ThePurplePlace
12. Lisa aka Myran
13. Hazel
14. Lisa C
15. Jessie Lubyk
16. Carol R

Powered by... Mister Linky's Magical Widgets.

4/24/11

iCopic CHallenge #26 WINNER!!

Hello everyone!!  Samantha here!

Tonight, I have a winner to announce!! Starting now, our special weekly winner is going to be showcased right here on the iCopic blog. Here we go!

And the lucky winner is. . . stephanie.

Stephanie has won the following awesome prize:


Stephanie, please email info@icopic.com your mailing information so that iCopic can get the prize out to you!

Stephanie made such a beautiful project this week for the Monochromatic challenge:


Remember to check back tomorrow to see what our next challenge will be!


4/23/11

Meet the new iCopic Design Team!

Hello everyone! Samantha here, and I am SOOOOOO excited to announce our new design team!! It was a really hard decision to make because every designer who applied was great.

If you didn't make it this time, there will be plenty of chances to be spotlighted right here on the blog. Every other Saturday is going to be Saturday Spotlight where we will be spotlighting some of the iCopic customer projects.

For your chance to be spotlighted, all you need to do is leave a comment on any Saturday Spotlight post with a link to a Copic project you are really proud of, or upload a project to our facebook page anytime.

I am going to be remaining the design team leader, and here is my new AMAZING team!!! They are all so incredibly talented and they can't wait to start sharing their work with you. You can click on their names to go to their blogs and see their projects.


So there's the team!! They will start posting their projects here starting on May 1st.


4/22/11

A Must Have ~

Hi friends!  It's Friday morning and I am late again...after spending the evening making my card for today, I went home to find that I had a sick little monkey on my hands.  Poor little guy has been running to the bathroom non-stop and wanting to hold mommy's hand in between.  He's finally resting, so I thought I'd pop in here and share this little ditty!  Thanks for waiting so patiently! ;o)

One thing I find indispensable is my Copic Color Chart.  You can find the file in the sidebar under the Resources heading.  I have mine printed on the paper that I use most often, Papertrey Ink Stamper's Select White; however, this one is old and doesn't have the new colors.  I'll have to update my chart to the one you can find on this blog once I get my new X-Press It paper that I've finally broken down and purchased! 

This is such a useful tool for many reasons. 
1. Quick reference of the colors that I own. 
2. Quick reference of the refills that I own.
3. Great for picking color combos.
4. Perfect for matching patterned papers.  This has to be the absolute most important one!  I've learned through the years (finally!) to pick my paper first!


I've colored up this sweet little Amelia again from The Greeting Farm's set Oliver & Amelia: Happy Day.  I'm still loving these bright colors on a bright white background, so I stuck with that!  Some glittery paper to mat and add some stars for fun!  Hope you like her!  Have a super weekend!  Hope it's sunshiny where you are!  :o) lyss
Copics {BG15, BG45, BG49, C1, C3, E000, E00, E02, E11, E13, E23, E25, E27, E29, R20, RV13, RV17, RV19, Y11, Y13}

4/19/11

Magnolia SALE!

Hey crafty friends! I've got a special announcement for you. Make sure that you scroll down to see this week's Tuesday Tips and Tricks tutorial.

iCopic.com is having a SALE!!!

All Magnolia Stamps are 10% off on purchase of $25 or more 04/19-04/22. Coupon Code: TILDA10
 
And, the best part is, the new Butterfly Dreams Collection is now available!! Make sure to pick some up while you are shopping at iCopic.com

Look at some of these gorgeous stamps!! I have had my eye on them for a while now.

My favorite one!!


  What are you going to order?

Please help spread the word about our sale so others can pick up some Tildas!

Tuesday Tips and Tricks: Paper Piecing with Copics

Hello there!! Samantha here, with another Tuesday Tips and Tricks segment!

Today, I would like to teach you how to enhance your paper piecing with Copics and atyouSpica glitter pens! iCopic has all the colors so make sure to stop by and pick up a few glitter pens!

I have a video for you walking you through my project from start to finish.


Easy huh?  It is so fun and easy to enhance your paper piecing projects with a little glitter and dimension.

And here is the finished project:

Now go do some paper piecing with your atyouSpica glitter pens and Copics!! We would love to see your paper piecing work so please leave us a comment below and we can check it out.

I hope you enjoyed my little video.  Have a great day!


4/17/11

iCopic Challenge #26

Hi everyone! Happy Monday!!

Are you ready for this week's challenge? The challenge is to make a monochromatic project. Monochromatic means one color, so use only one color for the majority of your project this week.


Inside you will find a showcase of stunningly detailed paper craft project sets. Sets include cards, party favors, gift wrap, invitations, package toppers, ornaments and much more!

Coloring Techniques for Card Making


For my monochromatic card, I decided to use YELLOW! This card features a new stamp from The Greeting Farm called Cheeky Beach.  Complete card details can be found by clicking here!

To enter the challenge, link up your card in Mr. Linky below. Don't have a blog? NO PROBLEM! Upload your project to any online gallery and then link up below. You can find the official challenge rules linked in the sidebar. Entries are due Sunday, April 24th at midnight EST.

I can't wait to see what you create!!

And the winner for Challenge #25 is Ashlee (Card #18). Please email us (info@icopic.com) your shipping address and the 4 Copic Ciao markers, thank you!

iCopic Challenges Participants
1. Susanne Giger
2. Kate Cordero
3. NikkiT
4. Lisa Rasmussen
5. Brenda
6. Lori A
7. DawnL
8. Rina Damay
9. Penni
10. darling Ho
11. Giovana
12. Heaney
13. Cindy Coutts
14. Ashley N Newell
15. darling Ho
16. Anja *AK-Artfolio*
17. MelissaMade
18. Alie
19. Hazel
20. Jan Hunnicutt
21. Rene
22. Brenda B
23. stephanie
24. Cindy Coutts
25. Shanna Shands
26. Kim Wiseman
27. Kelli

Powered by... Mister Linky's Magical Widgets.

4/15/11

CAS Monkey ~

Hi iCopic friends!  It's Alyssa finally checking in here on Friday morning, well morning for me at least!  Sorry I'm so late!  I had planned to work on a special something for you all yesterday and ended up having to work and do all the family things in the evening.  I was plumb tuckered out and needed to be fresh to make some eye candy for today!
I chose to use this darling little monkey from the CC Designs Itzie Inkies set Flower Power.  He's only about 2" tall, so I scaled the card size down to 3 1/2" by 5" - an unusual size but a fun one!  I'm really loving the look of CAS or Clean And Simple cards lately that allow the focus to remain on the colored image. 
I used the new Copic Sketch colors RV55, RV63 and RV66 to shade the flower.  For the grass, I used the same shadowing method that I use for the C series of grays.  I started with G07 close to and under the monkey's body, blended it out with YG09 and blended further withYG06.  If I'd had more room in the image, I would have used some quick strokes to make blades of grass so the ground line wasn't flat.  It's all about experimentation! 
iCopic is now carrying Baker's Twine too!  There are 11 different colors of this beautiful twine.  I used some Lemon twine to wrap the card and threaded it through a couple of buttons.  The sentiment is from Lawn Fawn's Just My Type clear set - I just love that font!  Sweet and simple!  Thanks for stopping by today!  Hope you have a super crafty weekend!!  :o) lyss
COPICS {B000, E29, E31, E33, E37, G07, R20, R29, R59, RV55, RV63, RV66, Y35, Y38, YG06, YG09, W5}

4/12/11

Tuesday Tips and Tricks: Strategic Buying

Hey everyone! Samantha here, and Welcome to this week's Tuesday Tips and Tricks segment.

I get asked A LOT about buying Copics. It is overwhelming because many of us are on a tight budget and there are soooo many markers to choose from. It is hard to narrow your wish list down because, let's face it, we want them ALL!! LOL And then it is hard to keep track of the colors you already purchased.

For a list of where to begin, click here for a previous Tuesday Tips and Tricks segment on the subject.

Well to start building your collection, my best piece of advice is to purchase in TWOS or THREES. Look at the Colorable Color Chart PDF (this is the updated chart in the sidebar) and decide which colors you would like. Then purchase the colors in the color family (meaning the same letter, and first digit).

You NEED to print that chart! It will help you keep track of what colors you have. Follow these easy steps:
  1. Print out the chart on whatever paper you like to use with your Copics (I prefer the XpressIt blending cardstock it is fabulous!). 
  2. Fill in the boxes for whatever colors you already own.
  3. As you purchase new colors, fill in the boxes for those colors.
  4. Keep your chart handy! It is an easy reference when coloring. You can see what the colors look like and use what you have. 
I keep my chart handy when coloring and when purchasing new colors. It is easy to see what colors are missing from the chart.

Here are some of my favorite "groups". Of these series, you can pick 2 of the colors and still get some really nice shading:
  • V12, V15, AND V17
  • R32, R35, AND R37
  • YR30 AND YR31
  • Y000, Y00, Y02
  • BG11, BG 13, AND BG15
You can't go wrong with whatever colors you choose! Just start small and before you know it, you will have a huge collection!

4/11/11

iCopic Challenge #25

Hello Copic lovers!

Happy Monday and welcome to this week's iCopic challenge!


The challenge:
Use your Copics to color an embellishment for your project!! It is so easy, and there are soooo many embellishments out there that can be colored: acetate, ribbon, trim, pearls, rhinestones, acrylic sheets, tulle, metal embellishments, canvas, fabric, paper flowers! You name it, it can probably be colored with Copics.

Entries are due on April 17th at midnight EST. Please make sure to enter the DIRECT link into Mr. Linky below. Official challenge rules are linked up in the sidebar if you need a refresher.


My example project above is a clean and simple card. I used YR16 to color the lace a bright orange! I just love the fact that Copics can color ribbons and lace. That means less buying for me because rather than buying every color, all I need is white and I have so many color choices at my fingertips.

I can't wait to see what you do!

And the winner for Challenge #24 is Katherine (Card #11). Please email us (info@icopic.com) your shipping address, thank you!

4/8/11

Hello Perfect Angel ~

Happy Friday, iCopic friends!  It's Alyssa here sharing another Thursday girl from the Greeting Farm's Creeper Crew.   Sometimes these images with large pieces to color can be a bit intimidating.  I'm here to show you a little trick that will make these areas easier and give your crafting a little texture too!  I'm talking about paper piecing!  So simple!  Since I wear a lot of plain colored shirts, I tend to utilize the plain, distressed papers that come in the Basic Grey paper packs for piecing...I don't know what else to use them for!  lol

Thursday's shirt and hat are pieced with a distressed orange paper from the {retired} Basic Grey Archaic line.  To give them a bit more life, they are shaded with Copics that matched - YR12, YR15, YR18, YR61 & YR65.  Her shirt needed a bit of spunk as well, so I added a fun image from the SP & Company clear set Rain Boots in Ranger Distress Tea Dye ink.  One tip I have for paper piecing is to shade your area, cut it out and then line the sides of the cut out *very* lightly with a black Copic.  It helps the piecing to blend in with the original stamped area instead of giving a white or ratty line against it.  Because most pattern papers are more flimsy than regular cardstock, you have to use a light hand to line the edges; otherwise, the black Copic will bleed into the pattern paper ruining all your hard work!  We just don't want that!!  lol 
Here is the finished piece.  The base panel was sponged with Ranger Distress Walnut Stain ink.  It helps to soften the strong pattern so all the intense patterns don't compete too much with each other. 
I wanted the inside to be decorated as well, so I used another distressed plain piece from the paper pack, a scrap of the base mat and some fun stamps.  Thursday is stamped lightly in Tea Dye ink.  She's not fully stamped to flow with the whole *Grunge* look!  The 'hello' sentiment is from Lawn Fawn's Just My Type, stamped at an angle in Walnut Stain ink.  'Perfect Angel' is from The Greeting Farm's Naughty or Nice set.  Such a wonderful way to combine sets and fonts for something fun...kind of a play on words since her little kitty hat looks like devil horns!
Thanks so much for stopping by today!  I always love your comments and encouragement!  Let me know if there is something more you would like to see here on the iCopic Lover blog!  Have a super weekend :o) lyss

Copics {B95, B97, B99, C1, E000, E00, E09, E11, E29, E33, E37, E43, E44, R20, YG63, YR12, YR15, YR18, YR61, YR65, 100 Black}; Copic Multiliner
Stamps: The Greeting Farm Thursday; The Greeting Farm Naughty or Nice; Lawn Fawn Just My Type; SP & Company Rain Boots

4/4/11

Tuesday Tips and Tricks

Hi Copic lovers!


Samantha here, bringing you another Tuesday Tips and Tricks segment.  Today, I would like to show you a fun way to use two new products that are available in the iCopic store.


I turned a simple white paper flower into something absolutely stunning (if I do say so myself) with the help of Ranger Distress Ink(Old Paper) and Sheer Shimmer Spritz by Tsukineko (Sparkle). I also used the SP and Company Hearty Hearts Backgrounds stamp set.


To see the complete layout and details, please stop by my blog by clicking here.


iCopic Challenge #24

Hi everyone!!

Once again this week, we are mixing things up and presenting a new type of challenge! This one is a technique challenge.


Another chance to get your hands on this new book!
Coloring Techniques for Card Making

Use a fancy background technique on your project! You can use any background technique you would like, airbrushed, watercolor-like, shadows, draw your own, or any other technique you would like to try!

To enter this week's challenge, simply enter a DIRECT link to your project below. Official challenge rules are linked up in the sidebar for easy reference. Entries are due on Sunday, April 10th at noon EST.

Here are some great resources if you are looking for tutorials or ideas:
The winner and prize will be posted very soon!

I can't wait to see what you all come up with this week!


    And the winner for Challenge #23 is LEIGH ANN BAIRD (Card #3). Please email us (info@icopic.com) your shipping address, thank you!


    4/2/11

    A little extra. . .

    Hey Copic friends!! If you need a little extra Copic inspiration to get you through the weekend, head on over to my blog (click here) and you are in for a treat! I posted a very fun colorful card over there using some of the best iCopic items.

    Here is a little sneaky peek for ya :)


    4/1/11

    The Old Black Typewriter ~

    Hi friends!  It's Alyssa back with another quickie card for you today.  Have you all checked out the latest iCopic color challenge?  This weeks challenge is to color black and white images with one accent color.  This technique seems so hard, but in reality, is one of the absolute easiest ways to make a card!  Seriously!  No hemming and hawing over what colors match the patterned paper you've chosen.  Just color an image in with your gray Copics in varying shades and add a pop of color!  So fun and simple!!
     I chose the typewriter from Lawn Fawn's Just My Type clear acrylic set...it reminds me of learning how to type in junior high  :o)  It's colored with Copics C1, C3, C5, C7 & C9 as well as the 0 Colorless Blender. 

    The layout is super duper simple because I want to make a little gift set of these cards that are easy to mail.  The message will say it all! 

    Hope you all are having a great day!  :o) lyss

    TwitterFacebookFavorites More